Ever found yourself knee-deep in YouTube uploads, realizing some videos just don’t make the cut anymore? Maybe you’ve evolved your style or that old vlog isn’t vibing with your current brand. Whatever the reason, it’s totally normal to want to hit that “delete” button and refresh your channel. Good news—removing videos from YouTube is easier than you might think! In this quick guide, we’ll walk you through every step with a friendly chat vibe so you can clear out those clips with confidence. Let’s dive in and declutter your digital space!
Understanding the Reasons Behind Video Removal
When your video disappears from YouTube, it can feel a bit like a bad magic trick—now you see it, now you don’t. Understanding the motivations behind these removals can shed some light on what’s happening behind the scenes. YouTube has strict policies that could lead to removal for several main reasons. For instance, violations of copyright laws are a biggie; if you use someone else’s content without permission, it’s like borrowing a shirt without asking. Another common issue is community guidelines violations, which can range from inappropriate content to spammy behavior. You want to keep your content squeaky clean and in line with what this platform expects.
In addition to copyright issues and community guidelines, monetization policies can also kick in. If you’re trying to make a buck off your videos, but your content doesn’t meet those monetization standards, your video may get the axe. Sometimes, even technical issues like glitches or accidental uploads can lead to removals. So, it’s essential to stay informed and ensure you’re creating content that aligns with YouTube’s ever-evolving landscape. Here’s a quick look at some of the top reasons for video removal:
| Reason for Removal | Description |
|---|---|
| Copyright Infringement | Using someone else’s original content without permission. |
| Community Guidelines Violation | Content that promotes hate speech, violence, or adult themes. |
| Spam and Scams | Posting repetitive or misleading content. |
| Quality Standards | Videos that are poorly made or lacking substance. |

Navigating YouTubes Removal Process Step-by-Step
Ready to spring clean your YouTube channel? First things first, head over to YouTube and log in to your account. Once you’re in, navigate to your dashboard by clicking on your profile picture in the top right corner. From there, select YouTube Studio. Think of this as your command center where you manage everything from video uploads to channel settings. Now, in the left-hand menu, click on Content. Here, you’ll see a list of all your uploaded videos. Find the one you want to remove and hover over it. You’ll notice a few options pop up, and it’s the Options button (three vertical dots) you’ll want to click on.
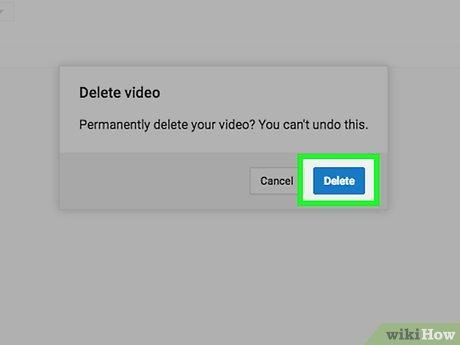
After clicking the Options button, you’ll see the choice to Delete Forever. Before you hit that button, take a deep breath—this action is permanent, and it’s like sending your video off into the great digital abyss. If you’re sure, go ahead and click Delete Forever. YouTube will ask you to confirm that you truly want to remove it, just to make sure you’re not pressing any buttons on a whim. Once confirmed, the video is gone, and you’ll notice it disappearing from your list. Easy, right? Now you can maintain a channel that aligns with your vision, keeping only the content you love! Keep in mind, everyone makes a few cringe-worthy videos along the way—it’s just part of the process!

Essential Tips to Ensure a Smooth Deletion Experience
When you’re ready to bid farewell to your videos, preparation is key! Aim for a smooth deletion by double-checking which videos you truly want to get rid of. You don’t want to accidentally wipe out that epic vlog from your trip or the killer tutorial that took hours to film, right? Before diving in, it’s also helpful to consider downloading any content you might want to save for your personal archives or to share elsewhere. After all, nostalgia has a way of creeping in when you least expect it!
Consider cleaning up your channel before you start deleting. This can mean adjusting your privacy settings or even communicating with subscribers if you’re making significant changes. Take note of the following steps to ensure you make it through with ease:
- Clear your browser cache and sign in to your YouTube account.
- Navigate to the “YouTube Studio” and find the “Content” section.
- Select the videos you want to delete—don’t forget to confirm your choice!
Keeping organized can help minimize stress. Think of it like decluttering your room—easier to find your favorite shirt when there’s less mess!

What to Do After Removing a Video: Clean-Up and Reflection
After hitting that “remove” button, it’s easy to feel a mix of relief and uncertainty. First things first, take a moment to breathe. Reflect on what led to your decision; was it outdated content, a shift in your brand, or just not hitting the mark with your audience? Take stock of important lessons learned during the creation process. Jot down any ideas for improvement and how you can apply those in future videos. Think of it as polishing a diamond—getting rid of the unnecessary bits makes the core shine brighter.
Next, it’s time for some digital spring cleaning. Review your channel and see if there are any lingering elements you need to tidy up, like outdated descriptions, old tags, or thumbnails that no longer resonate with your brand identity. It’s also a great idea to connect with your audience—tell them why certain videos were removed and what new content they can look forward to. A little transparency can go a long way in maintaining trust. Want to share your journey? Craft a new video or a community post that outlines what you’ve learned, keeping your audience in the loop like a good friend would.
Concluding Remarks
And there you have it! Removing your YouTube videos doesn’t have to be a headache — it’s as easy as pie once you know the ropes. Just remember to take a deep breath, double-check that you really want to delete that video, and follow the steps we laid out. Whether it’s an old vlog, a cringy DIY project, or something you wish had never seen the light of day, you now have the tools at your fingertips to clean up your channel. Whatever the reason, it’s your content, your rules! So go ahead, take control, and make your channel reflect the amazing creator you are. Happy YouTubing!